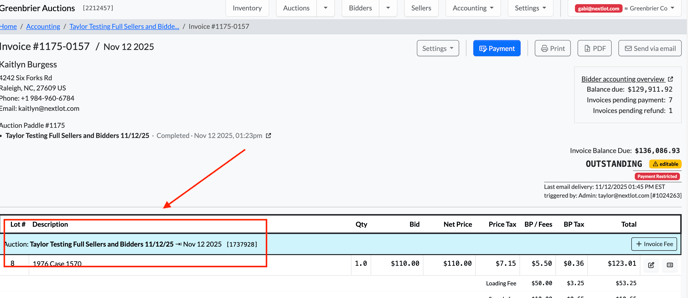
Once you have invoices from an auction, you will need to begin checking out your bidders and accept payment for their items. This article will cover the different payment options.
Online-Based Payments
If you have set up your site to accept online-based payments (via Card or ACH), then you can begin having bidders pay for their invoices online or charge their card attached to their bidder profile.
Charging Cards In Bulk
Before bulk charging invoices, you must first bulk email them (or email individually the invoices you WANT to bulk charge). To do this, navigate to the “Send Email” button outlined in green. Click it to open a pop-up modal where you can choose to send invoices for that particular auction with either a “Payment Outstanding” or “Settled” status.

You’ll also see an option labeled “Skip when another email was already sent after” with a dropdown menu (1, 2, 5, or 10 days). This prevents duplicate emails from being sent too frequently. For example, if Jane Smith has an outstanding invoice from four days ago that was last emailed 4 days ago and another from yesterday that was last emailed yesterday, selecting “EOD ~2 Day” will resend only the older invoice and skip the recent one.

Once emails have been successfully sent, a green envelope icon will appear on the right-hand side of the invoice with a time stamp of the most recently sent email, next to the paper and pencil “edit” button (see image below). IF an invoice has NOT ever been emailed the email send portion of that row will remain blank (see top row below for this example).

Important: If you attempt to bulk charge invoices before emailing them, you will receive the following error message: “No invoices are scheduled for merchant-initiated card charges.” See video below for demonstration:
Charging an Individual Invoice
If you would like to manually charge an invoice instead of charging all filtered invoices in bulk, you can go directly into the invoice by clicking edit and then using the blue "Payment" button. As shown in the image below, when you navigate to the blue Payment button, you will have the option to select and charge all outstanding invoices, if applicable. The invoice you initially navigated to will be automatically selected.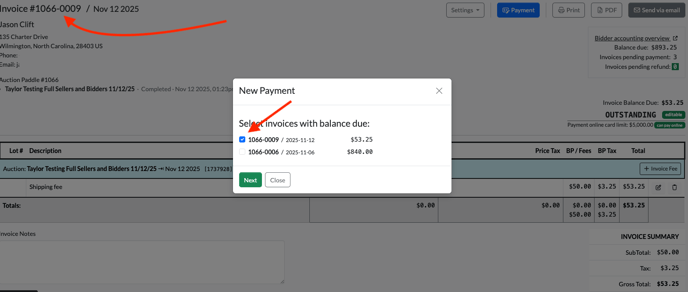
Once you click next, there is an option on the far right called "Card on File." When you navigate there, it will list the bidder's card on file (the card name label, last 4 digits and expiration) that you can process for the payment. Simply click Create payment to charge the card. Please see the screenshot below.
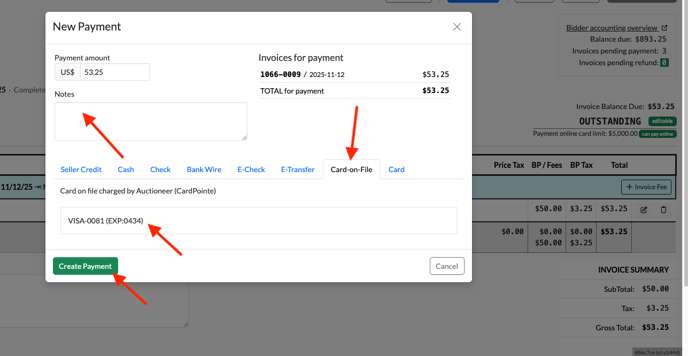
Additionally, you can use the Notes feature to record important payment details, such as:
“Buyer will return on November 3rd to pay the remaining balance in cash.”
You also have the ability to record partial payments. When a partial payment is made, the invoicing system automatically updates the invoice to reflect the payment received and the remaining balance due. The invoice status will remain “Payment Outstanding” until the full balance is paid. To make a partial payment, simply adjust the value in the upper left hand corner of the payments page (see video below) to record a payment for that amount.
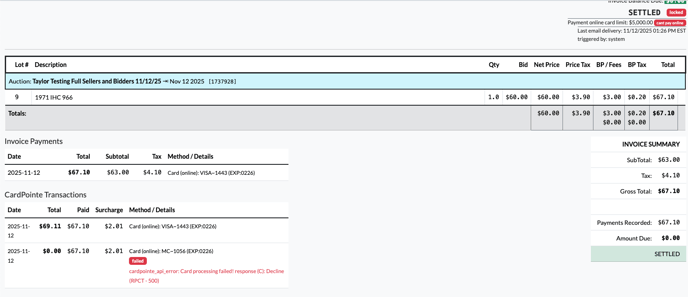
Cardpointe Transactions recorded on Admin Invoice View:
We can view all of the CardPointe transactions on a given invoice, including failed attempts and the reasons for those failed attempts. This information is located in the bottom left-hand corner of the invoice. This information is NOT included on the Bidders copy (or a printed copy) just on the admin UI view of the invoice.
Payment Restricted Items
When a lot is marked as payment restricted (meaning any invoice that it is added to will not be permitted to be paid online with a card or ACH payment), bidders are correctly prevented from making an online payment for that invoice. However, when an admin accesses the same invoice and attempts to apply a payment, the “Card on File” option is not greyed out. While the admin can select “Card on File,” the payment will not process, and an error message will appear in red stating:
“Invoice ____ has item(s) that are online payment restricted.” See below for example:

You will also notice that on the original invoice, it will have a NOTE attached to it by the outstanding balance (see above right-hand arrow) indicating that the invoice is payment restricted, so it cannot be paid using an online payment. If a customer sees this notice, they should know that they cannot go in and pay this invoice through online payments.
Onsite Payments
Bidders are given several different options for their payments to be recorded for their invoices if they do not want to pay online using the 2 above-described options. These options include using Seller Credit, paying cash, paying with a check, a bank wire, an e-check (ACH), E-Transfer (Canadian ACH type payment), or with a card onsite.
If a bidder decides to settle their outstanding invoice onsite, the admin has several options for processing payment and/or settling the invoice. To begin, navigate to the bidder’s invoice and click the Payment button. From there, you can select the current invoice or choose to settle all outstanding invoices. The admin will then be presented with several options for processing payment and settling the invoice(s). These options are described in detail below.
Seller Credit:
Coming Soon
Cash: If a bidder wishes to pay with cash in person, the admin will navigate to the Cash tab (which is the default tab when processing a payment). The system will automatically populate the Cash Received field with the exact amount of the selected outstanding invoices. If the bidder pays the exact amount, simply click Create Payment.

However, if the bidder provides more than the outstanding balance—such as when they do not have smaller bills—you would manually enter the amount they handed you into the Cash Received field. The Change Due field will then automatically calculate how much change is owed to the bidder. In the example shown, the bidder gave the admin $850.00 in cash because they only had $50 bills, so the auction house owes them $10 in change.

After you create the payment, the bottom-left section of the invoice under Method/Details will display “Cash,” the total amount the bidder provided, and the amount of change the auction house returned to them.

Check: If a bidder wishes to pay with a check in person, the admin will navigate to the Check tab. From there, you will enter the Check # and the Payee, which refers to the person or entity receiving the funds—in this case, the auction house. The Payee field will automatically populate with the auction house’s name, but it can be edited if necessary. There is also a Memo field that can be used to add a brief note describing the purpose of the payment.
 It is important to note that selecting the "Check" option does not indicate that the check has been deposited or successfully processed. It simply records that the bidder paid by check and marks their outstanding balance as settled.
Bank Wire: If a bidder wishes to pay with a bank wire in person, the admin will navigate to the Bank Wire tab. From there, the admin will enter the "Bank" field with whatever bank the bidder is using to pay their funds. The admin will then enter into the # field any type of record identifier indicating that the bank wire has been processed—for example, a transaction or reference number. This field can include both numbers and letters.
It is important to note that selecting the Bank Wire option does not confirm that the wire has been deposited or successfully processed. It simply records that the bidder paid by bank wire and marks their outstanding balance as settled.

E-Check: If a bidder wishes to pay with an E-Check in person, the admin will navigate to the E-Check tab. From there, the admin will enter the "Bank" field with whatever bank the bidder is using to pay their funds. The admin will then enter into the # field any type of record identifier indicating that the bank wire has been processed—for example, a transaction or reference number. This field can include both numbers and letters.
It is important to note that selecting the E-Check option does not confirm that the E-Check has been deposited or successfully processed. It simply records that the bidder paid by E-Check and marks their outstanding balance as settled.

E-Transfer: If a bidder wishes to pay with an E-Transfer in person (digital method for sending money between personal or business accounts, mostl commonly known in Canada as an Interac e-Transfer), the admin will navigate to the E-Transfer tab. From there, the admin will enter the "Bank" field with whatever bank the bidder is using to pay their funds. The admin will then enter into the # field any type of record identifier indicating that the bank wire has been processed—for example, a transaction or reference number. This field can include both numbers and letters.
It is important to note that selecting the E-Transfer option does not confirm that the E-Transfer has been deposited or successfully processed. It simply records that the bidder paid by E-Transfer and marks their outstanding balance as settled.

Card: If a bidder wishes to pay with a credit card in person, the admin will navigate to the Card tab. A note will appear stating “card charged external of system.” This indicates that the admin has charged a card not on file for the bidder (if the bidder is enrolled in NextLot Pay), or that the payment was processed externally—either through a physical payment terminal or by manually submitting the payment in CardPointe’s Virtual Terminal.
It is important to note that selecting the Card option does not confirm that the credit card has been successfully processed. It simply records that the bidder paid by credit card and marks their outstanding balance as settled.

Additional Invoice Payments Notes
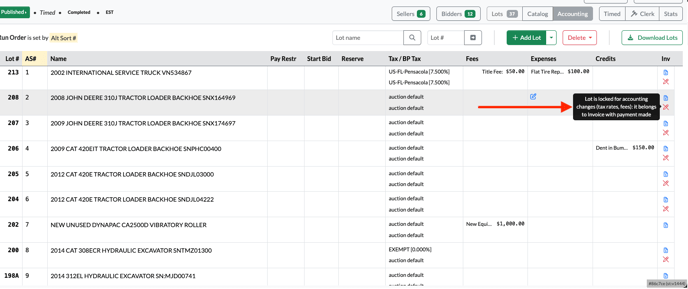
Once a bidder's invoice has a payment attached to it, it becomes LOCKED, and edits cannot be made to the invoice except for the Lot names (see screenshot below for adjusting the lot name on the invoice). If you adjust the lot name on the invoice, it will also update everywhere else the Lot's name is displayed. This is to help provide accurate accounting practices.
Creating an Additional Invoice for a Bidder When the Original Invoice is Paid
After a bidder pays their invoice, or an admin marks the invoice as Settled, there is now an option to create an additional invoice if the bidder needs to be billed again after they have a zero balance—for example, for shipping charges.
There are two ways to create a new invoice:
From the settled invoice:
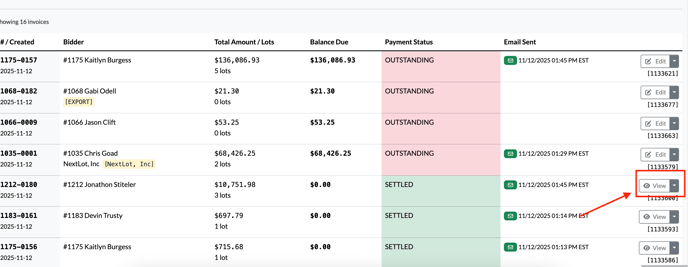
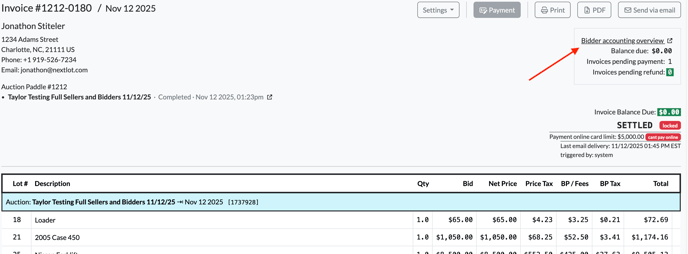
Click View on the bidder’s settled invoice, then select Bidder Accounting Overview. From there, you will see the + New Invoice button on the right side of the screen above the bidder’s list of invoices.
From the Bidders tab:
Navigate to the Bidders tab at the top of the navigation bar, search for the bidder, and click the white icon with a paper and dollar sign—the Go to Accounting icon.
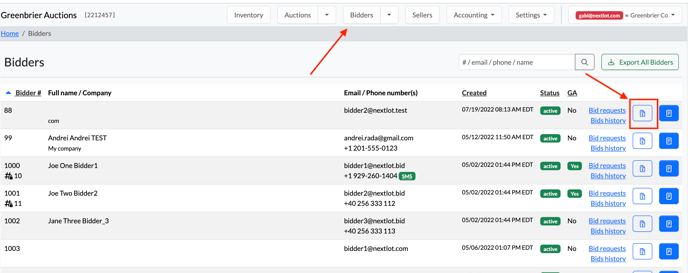
From there, you will see the + New Invoice button on the right side of the screen above the bidder’s list of invoices.

A pop-up box will appear prompting you to enter what the new invoice is for (e.g., shipping), the amount, and the tax rate. After entering the details, click the green Save button.

You will then be taken to the newly created invoice. You can interact with this invoice just like any other—such as creating a payment, adding fees, etc.
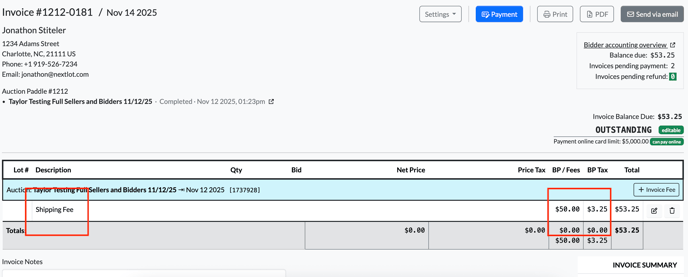
Please note: The newly created invoice will still display an auction section in blue. The auction shown will correspond to whichever auction was associated with the + New Invoice button you selected.
